Aceesing Web Url "google.com"
Let's see what goes behind the screen when you type “http://www.google.com” and hit enter in web browser.
Step 1: Obtaining own IP address to Getting Started- DHCP
Lets say Bob wants to visit http://www.google.com. He quickly opens his browser and types in the name of website, quickly within a click on enter, the web page has been loaded on his screen. Lets sit back for a moment and take a quick look on what just happened when he pressed enter.
Obtaining own IP address to Getting Started- DHCP

When Bob turns on his laptop it boots up. At this moment it do not have an IP address assigned to it for communicating with the outside world. And Bob can’t do anything without an IP address. Don’t be afraid, he won’t be isolated from the world of web for long. DHCP (Dynamic Host Control Protocol) will jump in for his rescue.
The first network related action taken by Bob’s laptop will be to run DHCP protocol to obtain an IP address. Operating system on Bob’s laptop will create a DHCP request message and will place this in a UDP segment placed in an IP Datagram with source IP as 0.0.0.0 (since Bob don't have an IP address till now) and destination IP 255.255.255.255 which is a broadcast address.
This IP datagram is placed in Ethernet frame having destination MAC address as FF:FF:FF:FF:FF:FF (for broadcast) and Source Mac of Bob’s MAC address.
The DHCP request thus broadcasted in the network is received by the DHCP server. The server on seeing source IP address as 0.0.0.0 understands that this request is for assignment of IP address. DHCP server will now allocate IP address say 69.56.2.101 to Bob’s laptop. Now the DHCP server will send a DHCP offer message in which it offers Bob:
Assigned IP address
the IP address of the DNS Server
IP address of the default gateway router
Subnet mask.
It is put into a udp segment, in IP datagram inside Ethernet frame with destination MAC address of Bob’s Laptop. Once this is received by Bob’s laptop it will request DHCP server for the given offer.
Finally the DHCP server confirms back with DHCP ACK message the given IP and lease it to Bob’s DHCP client. Bob’s laptop will now extract the IP datagram from the received ethernet frame and then extracts udp segment from the IP datagram and finally extracts DHCP message .
The DHCP client will now:
record its own IP address.
record IP address of DNS server.
install address of default gateway into its IP Forwarding table.
will send datagrams with destination address outside of its subnet to the default gateway
Now Bob’s laptop has initialized its networking components and is ready for processing the web page fetching.
Step 2: Bob types in http://www.google.com in his Web Browser - DNS & ARP
Now as Bob has obtained his own IP address from DHCP Server, Bob moves on and types in the URL of the web server he wishes to browse.
Bob’s web server begins by the process of creating a tcp socket, that will be used to send HTTP Request to http://www.google.com. But for Bob’s laptop to actually do that it requires the IP address of the http://www.google.com. Now Bob will have to utilize the super power provided to his by DNS (Domain Name Server) protocol which provides name-to-IP address translation service (UDP Port #53).
Now for Bob’s operating system to send a DNS query message to the DNS server (whose IP he just received from DHCP ACK), he has to place it in UDP segment in IP datagram with source IP address i.e. his own IP address and Destination IP address that is the DNS IP address.
Now the IP datagram has to be placed in Ethernet frame with source MAC address of his own and Destination IP address of the default gateway. But wait an minute! what Bob obtained from her DHCP request is the IP address of his default gateway and not the mac address. Here comes in another superpower ARP (Address resolution Protocol) to his rescue.
So now Bob has to create ARP query, with target IP address of the default gateway and place it in a ethernet frame and broadcast it with destination IP as FF:FF:FF:FF:FF:FF. It will deliver the frame to all connected devices.
Gateway Router receives ARP request and finds the target IP address as its own IP address and sends back ARP reply indicating its own MAC address and sends ARP reply to Bob.
Bob receives the frame containing ARP reply and extracts the MAC address of the default gateway from the message.
And hurry!! Now our Bob is all set to send a DNS query to the DNS Server.
Let's understand a bit about DNS Server.
DNS(Domain Name System) is a database that maintains the name of the website (URL) and the particular IP address it links to. Every single URL on the internet has a unique IP address assigned to it. The IP address belongs to the computer which hosts the server of the website we are requesting to access. For example, www.google.com has an IP address of 142.250.180.14. So if you’d like, you can reach www.google.com by typing http://142.250.180.14 on your browser. DNS is a list of URLs, and their IP addresses, like how a phone book is a list of names and their corresponding phone numbers.
The primary purpose of DNS is human-friendly navigation. You can easily access a website by typing the correct IP address for it on your browser, but imagine having to remember different sets of numbers for all the sites we regularly access? Therefore, it is easier to remember the name of the website using a URL and let DNS do the work for us by mapping it to the correct IP.
To find the DNS record, the browser checks four caches.
● First, it checks the browser cache. The browser maintains a repository of DNS records for a fixed duration for websites you have previously visited. So, it is the first place to run a DNS query.
● Second, the browser checks the OS cache. If it is not in the browser cache, the browser will make a system call (i.e., gethostname on Windows) to your underlying computer OS to fetch the record since the OS also maintains a cache of DNS records.
● Third, it checks the router cache. If it’s not on your computer, the browser will communicate with the router that maintains its’ own cache of DNS records.
● Fourth, it checks the ISP cache. If all steps fail, the browser will move on to the ISP. Your ISP maintains its’ own DNS server, which includes a cache of DNS records, which the browser would check with the last hope of finding your requested URL.
If the requested URL is not in the cache, ISP’s DNS server initiates a DNS query to find the IP address of the server that hosts google.com. In this situation, we would call the ISP’s DNS server a DNS recursor whose responsibility is to find the proper IP address of the intended domain name by asking other DNS servers on the internet for an answer. The other DNS servers are called name servers since they perform a DNS search based on the domain architecture of the website domain name.
Without further confusing you, I’d like to use the following diagram to explain the domain architecture.

Many website URLs we encounter today contain a third-level domain, a second-level domain, and a top-level domain. Each of these levels contains their own name server, which is queried during the DNS lookup process.
For google.com, first, the DNS recursor will contact the root name server. The root name server will redirect it to the .com domain name server. .com name server will redirect it to the google.com name server in its’ DNS records and return it to your DNS recursor, which will send it back to your browser.
These requests are sent using small data packets that contain information such as the content of the request and the IP address it is destined for (IP address of the DNS recursor). These packets travel through multiple networking equipment between the client and the server before it reaches the correct DNS server. This equipment use routing tables to figure out which way is the fastest possible way for the packet to reach its’ destination. If these packets get lost, you’ll get a request failed error. Otherwise, they will reach the correct DNS server, grab the correct IP address, and come back to your browser.
DNS server receives the message and forms DNS reply message containing hostname-to-IP address mapping and sends it back to Bob’s laptop.
Finally Bob receives the DNS reply message and extracts the IP address of http://www.google.com and is ready to contact it!!!!!!
Step 3: Web Client-Server Interaction
Yippyyyyy! its time to get the harvest from what we sow in first two steps. Now Bob has his DNS reply ie IP address of http://www.google.com now we can move ahead for what we actually wanna do.

Now its time to create a TCP socket for sending HTTP get message to http://www.google.com. This created TP socket performs a Three way handshaking with the TCP in http://www.google.com .
It first sends a TCP Sync message towards http://www.google.com. And the message arrives at http://www.google.com. The TCP Sync message is then extracted and demultiplexed to the welcome socket port associated with port 80. Hence a connection socket is created between Google’s HTTP server and Bob’s laptop.
A TCP SYNC ACK signal is generated and sent back to Bob’s laptop which arrives at ethernet card in Bob’s laptop. The datagram is demultiplexed to the TCP socket at Bob’s laptop and it enters the connected state.
Finally Bob’s laptop sends HTTP get message to Web server and receives back a HTTP response message back.
The browser sends an HTTP request to the webserver.
Once the TCP connection is established, it is time to start transferring data! The browser will send a GET request asking for google.com web page. If you’re entering credentials or submitting a form, this could be a POST request. This request will also contain additional information such as browser identification (User-Agent header), types of requests that it will accept (Accept header), and connection headers asking it to keep the TCP connection alive for additional requests. It will also pass information taken from cookies the browser has in store for this domain.Sample GET request (Headers are highlighted):

(If you’re curious about what’s going on behind the scenes, you can use tools such as Firebug to take a look at HTTP requests. It is always fun to see the information passed between clients and servers without us knowing).
The server handles the request and sends back a response.
The server contains a webserver (i.e., Apache, IIS) that receives the request from the browser and passes it to a request handler to read and generate a response. The request handler is a program (written in ASP.NET, PHP, Ruby, etc.) that reads the request, its’ headers, and cookies to check what is being requested and also update the information on the server if needed. Then it will assemble a response in a particular format (JSON, XML, HTML).
The server sends out an HTTP response.
The server response contains the web page you requested as well as the status code, compression type (Content-Encoding), how to cache the page (Cache-Control), any cookies to set, privacy information, etc.
Example HTTP server response:
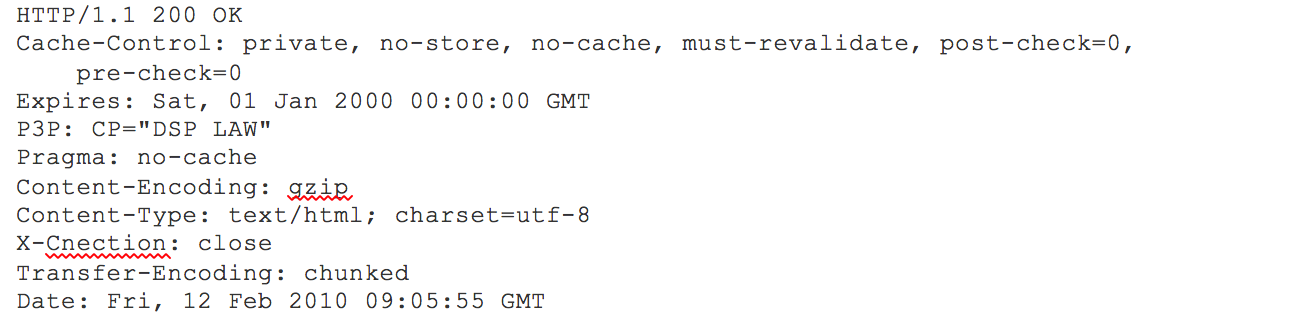
If you look at the above response, the first line shows a status code. This is quite important as it tells us the status of the response. There are five types of statuses detailed using a numerical code.
● 1xx indicates an informational message only
● 2xx indicates the success of some kind
● 3xx redirects the client to another URL
● 4xx indicates an error on the client’s part
● 5xx indicates an error on the server’s part
So, if you encountered an error, you can take a look at the HTTP response to check what type of status code you have received.
The browser displays the HTML content (for HTML responses, which is the most common).
The browser displays the HTML content in phases. First, it will render the bare bone HTML skeleton. Then it will check the HTML tags and send out GET requests for additional elements on the web page, such as images, CSS stylesheets, JavaScript files, etc. These static files are cached by the browser, so it doesn’t have to fetch them again the next time you visit the page. In the end, you’ll see google.com appearing on your browser.
That’s it!
All of these steps happen within milliseconds, enabling the user to see the Google homepage in a matter of seconds after hitting enter on their keyboard.